> ## Documentation Index
> Fetch the complete documentation index at: https://upstash-fix-issues-on-docs.mintlify.site/llms.txt
> Use this file to discover all available pages before exploring further.
# Use Serverless Kafka as an Event Source For AWS Lambda
In this tutorial we will implement a serverless message processing pipeline
using Upstash Kafka and AWS Lambda. We will use Upstash Kafka as a source for an
AWS Lambda function. The produced messages will trigger AWS Lambda, so your
Lambda function will process the messages.
Because Upstash Kafka is a true serverless product, the whole pipeline will be
serverless. You pay only when your pipeline is actively processing messages.
### Create Upstash Kafka
First, create an Upstash Kafka cluster and topic following
[those steps.](../overall/getstarted) You will need the endpoint, username and
password in the following steps.
 ### Create AWS Lambda Function
Now let’s create an AWS Lambda function. For the best performance, select the
same region with Upstash Kafka cluster. We will use Node.js runtime.
### Create AWS Lambda Function
Now let’s create an AWS Lambda function. For the best performance, select the
same region with Upstash Kafka cluster. We will use Node.js runtime.
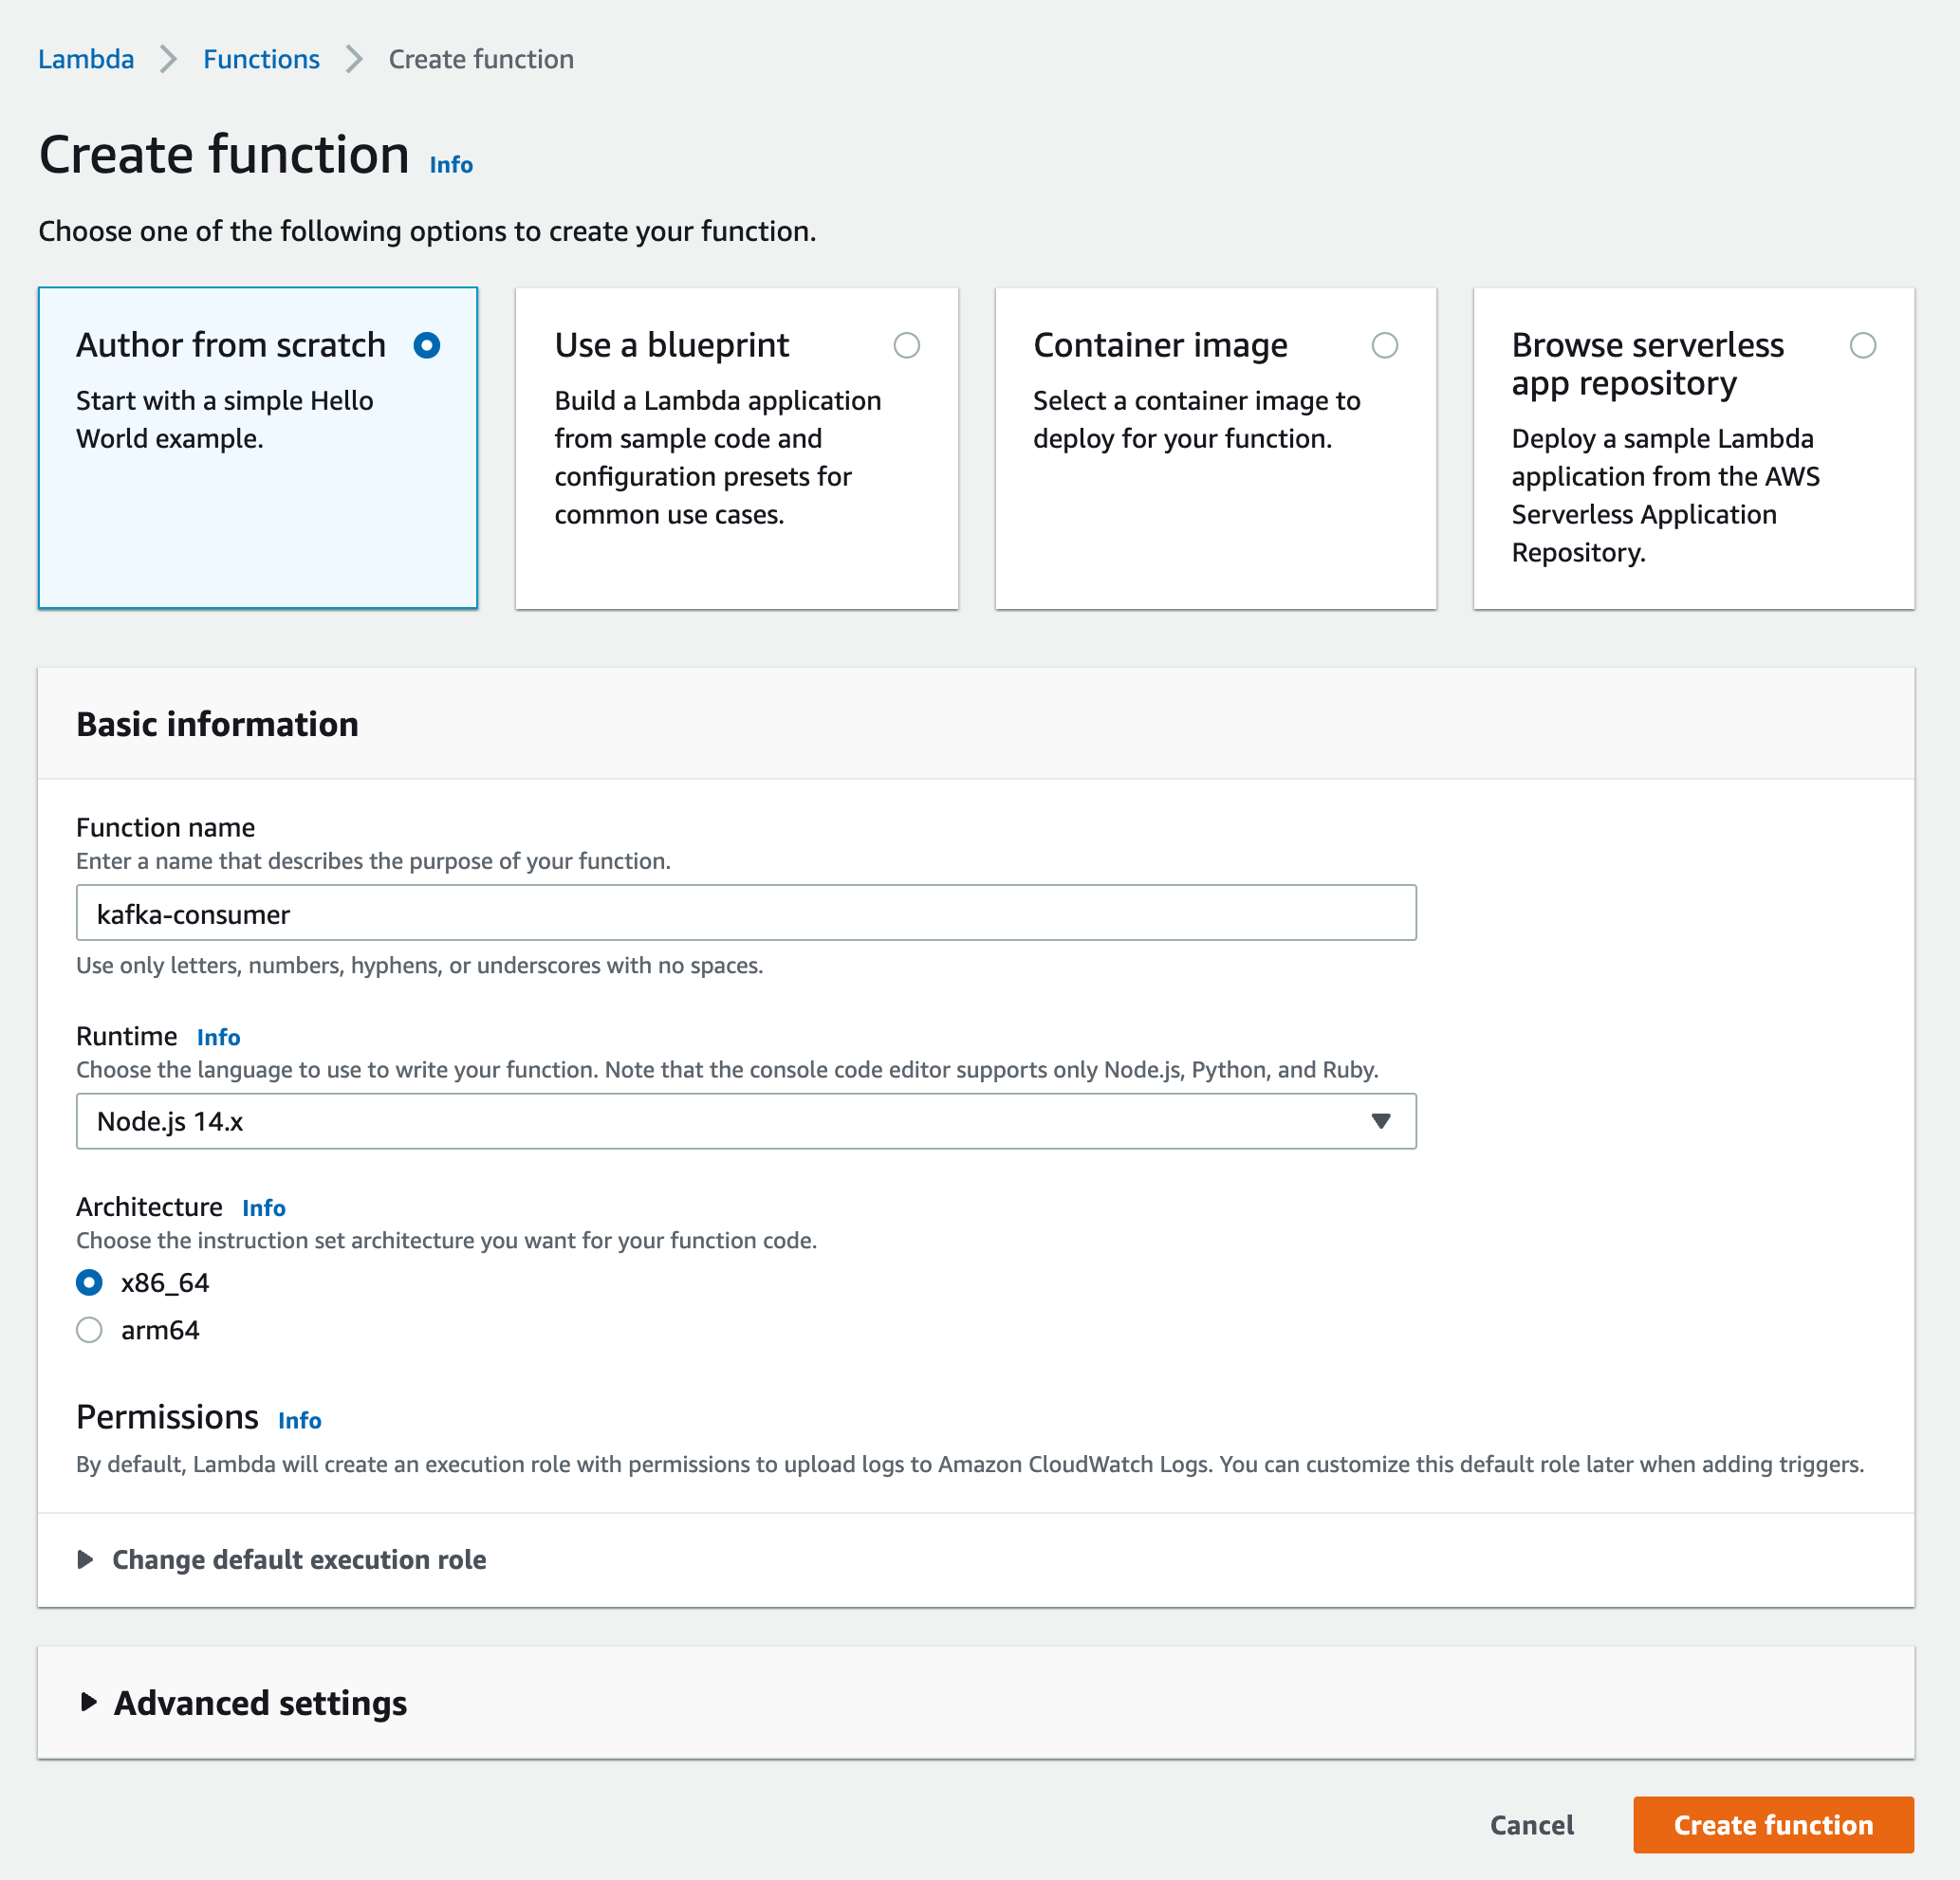 You can use Serverless Framework or AWS SAM for this step.
### Lambda Function Code
Update your function's code as below:
```javascript
exports.handler = async (event) => {
if (!event.records) {
return { response: "no kafka event" };
}
for (let messages of Object.values(event.records)) {
for (let msg of messages) {
let buff = Buffer.from(msg.value, "base64");
let text = buff.toString("ascii");
// process the message
console.log(text);
}
}
return { response: "success" };
};
```
The above code parses the Kafka message from the event parameter. AWS encodes
the message using `base64` so we decode the message and log it to the console.
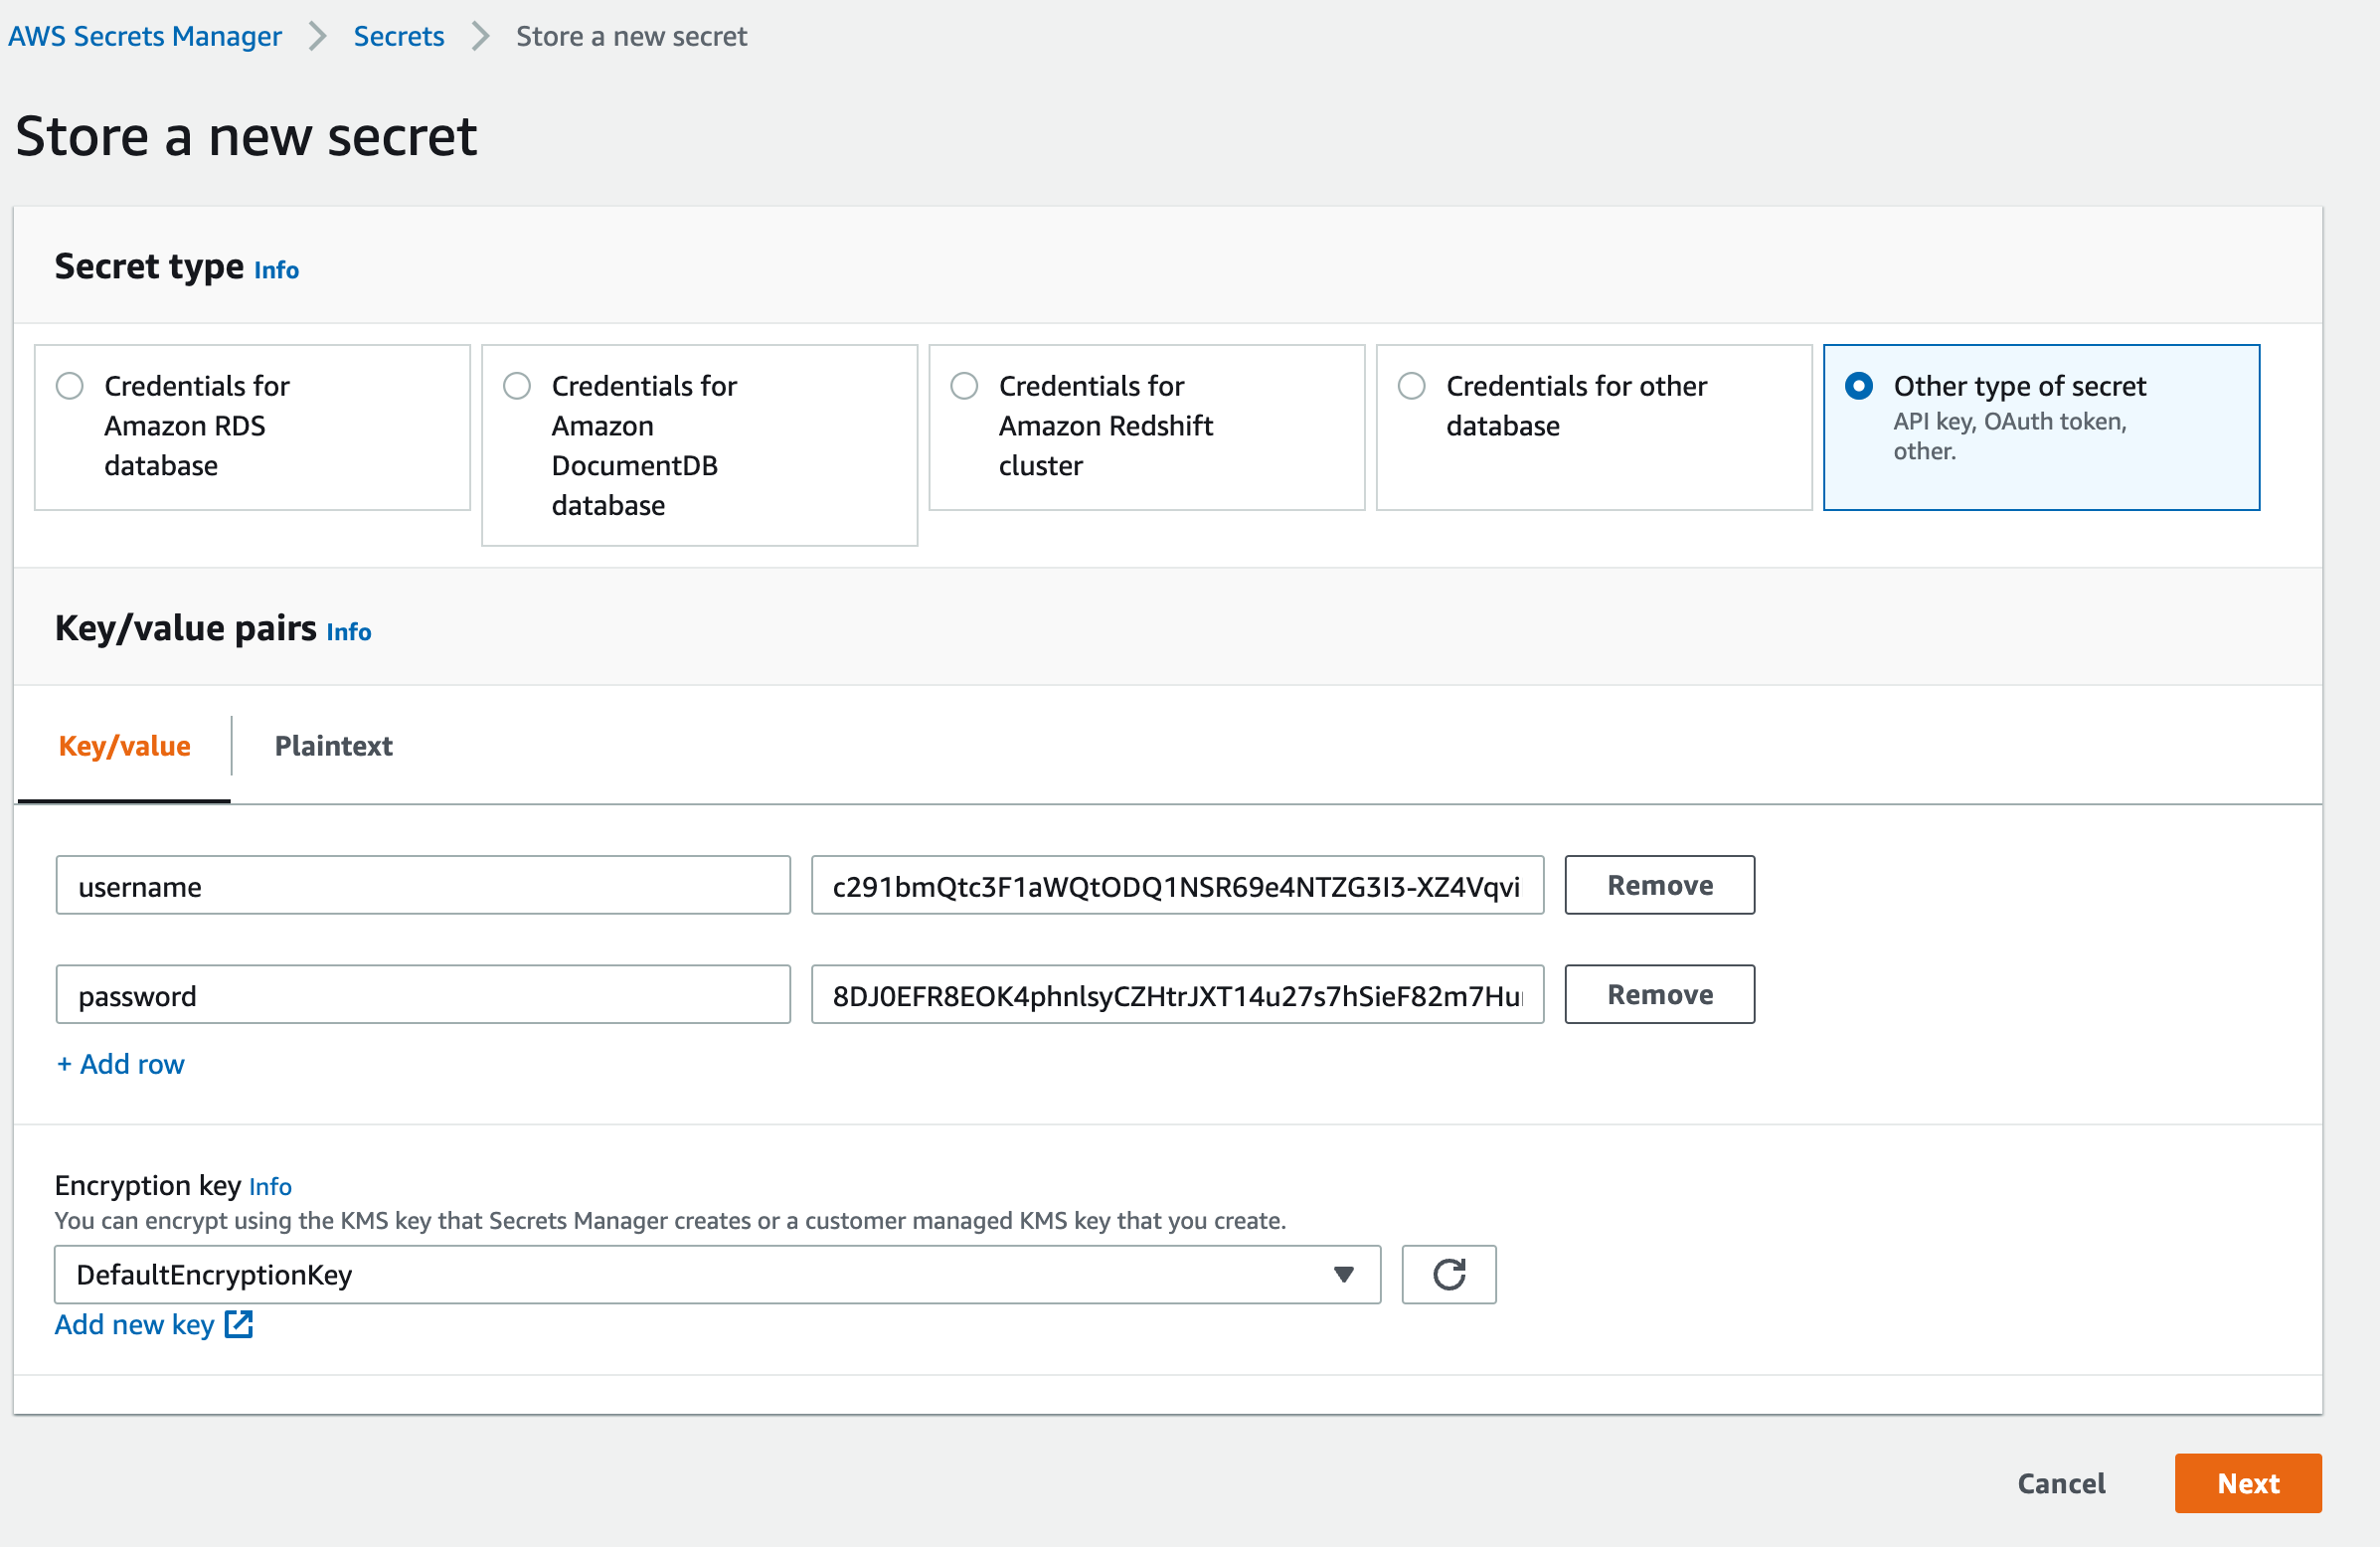
### Create AWS Secret
AWS Lambda trigger needs the Kafka credentials to be bundled as a secret. So we
will create a secret in
[AWS Secrets Manager](https://console.aws.amazon.com/secretsmanager/home?region=us-east-1#!/newSecret?step=selectSecret).
Select `Other type of secret`. Enter your Kafka cluster's username and password
as key/value pairs as below:
You can use Serverless Framework or AWS SAM for this step.
### Lambda Function Code
Update your function's code as below:
```javascript
exports.handler = async (event) => {
if (!event.records) {
return { response: "no kafka event" };
}
for (let messages of Object.values(event.records)) {
for (let msg of messages) {
let buff = Buffer.from(msg.value, "base64");
let text = buff.toString("ascii");
// process the message
console.log(text);
}
}
return { response: "success" };
};
```
The above code parses the Kafka message from the event parameter. AWS encodes
the message using `base64` so we decode the message and log it to the console.
### Create AWS Secret
AWS Lambda trigger needs the Kafka credentials to be bundled as a secret. So we
will create a secret in
[AWS Secrets Manager](https://console.aws.amazon.com/secretsmanager/home?region=us-east-1#!/newSecret?step=selectSecret).
Select `Other type of secret`. Enter your Kafka cluster's username and password
as key/value pairs as below:
 In the next screen give a name to your secret.
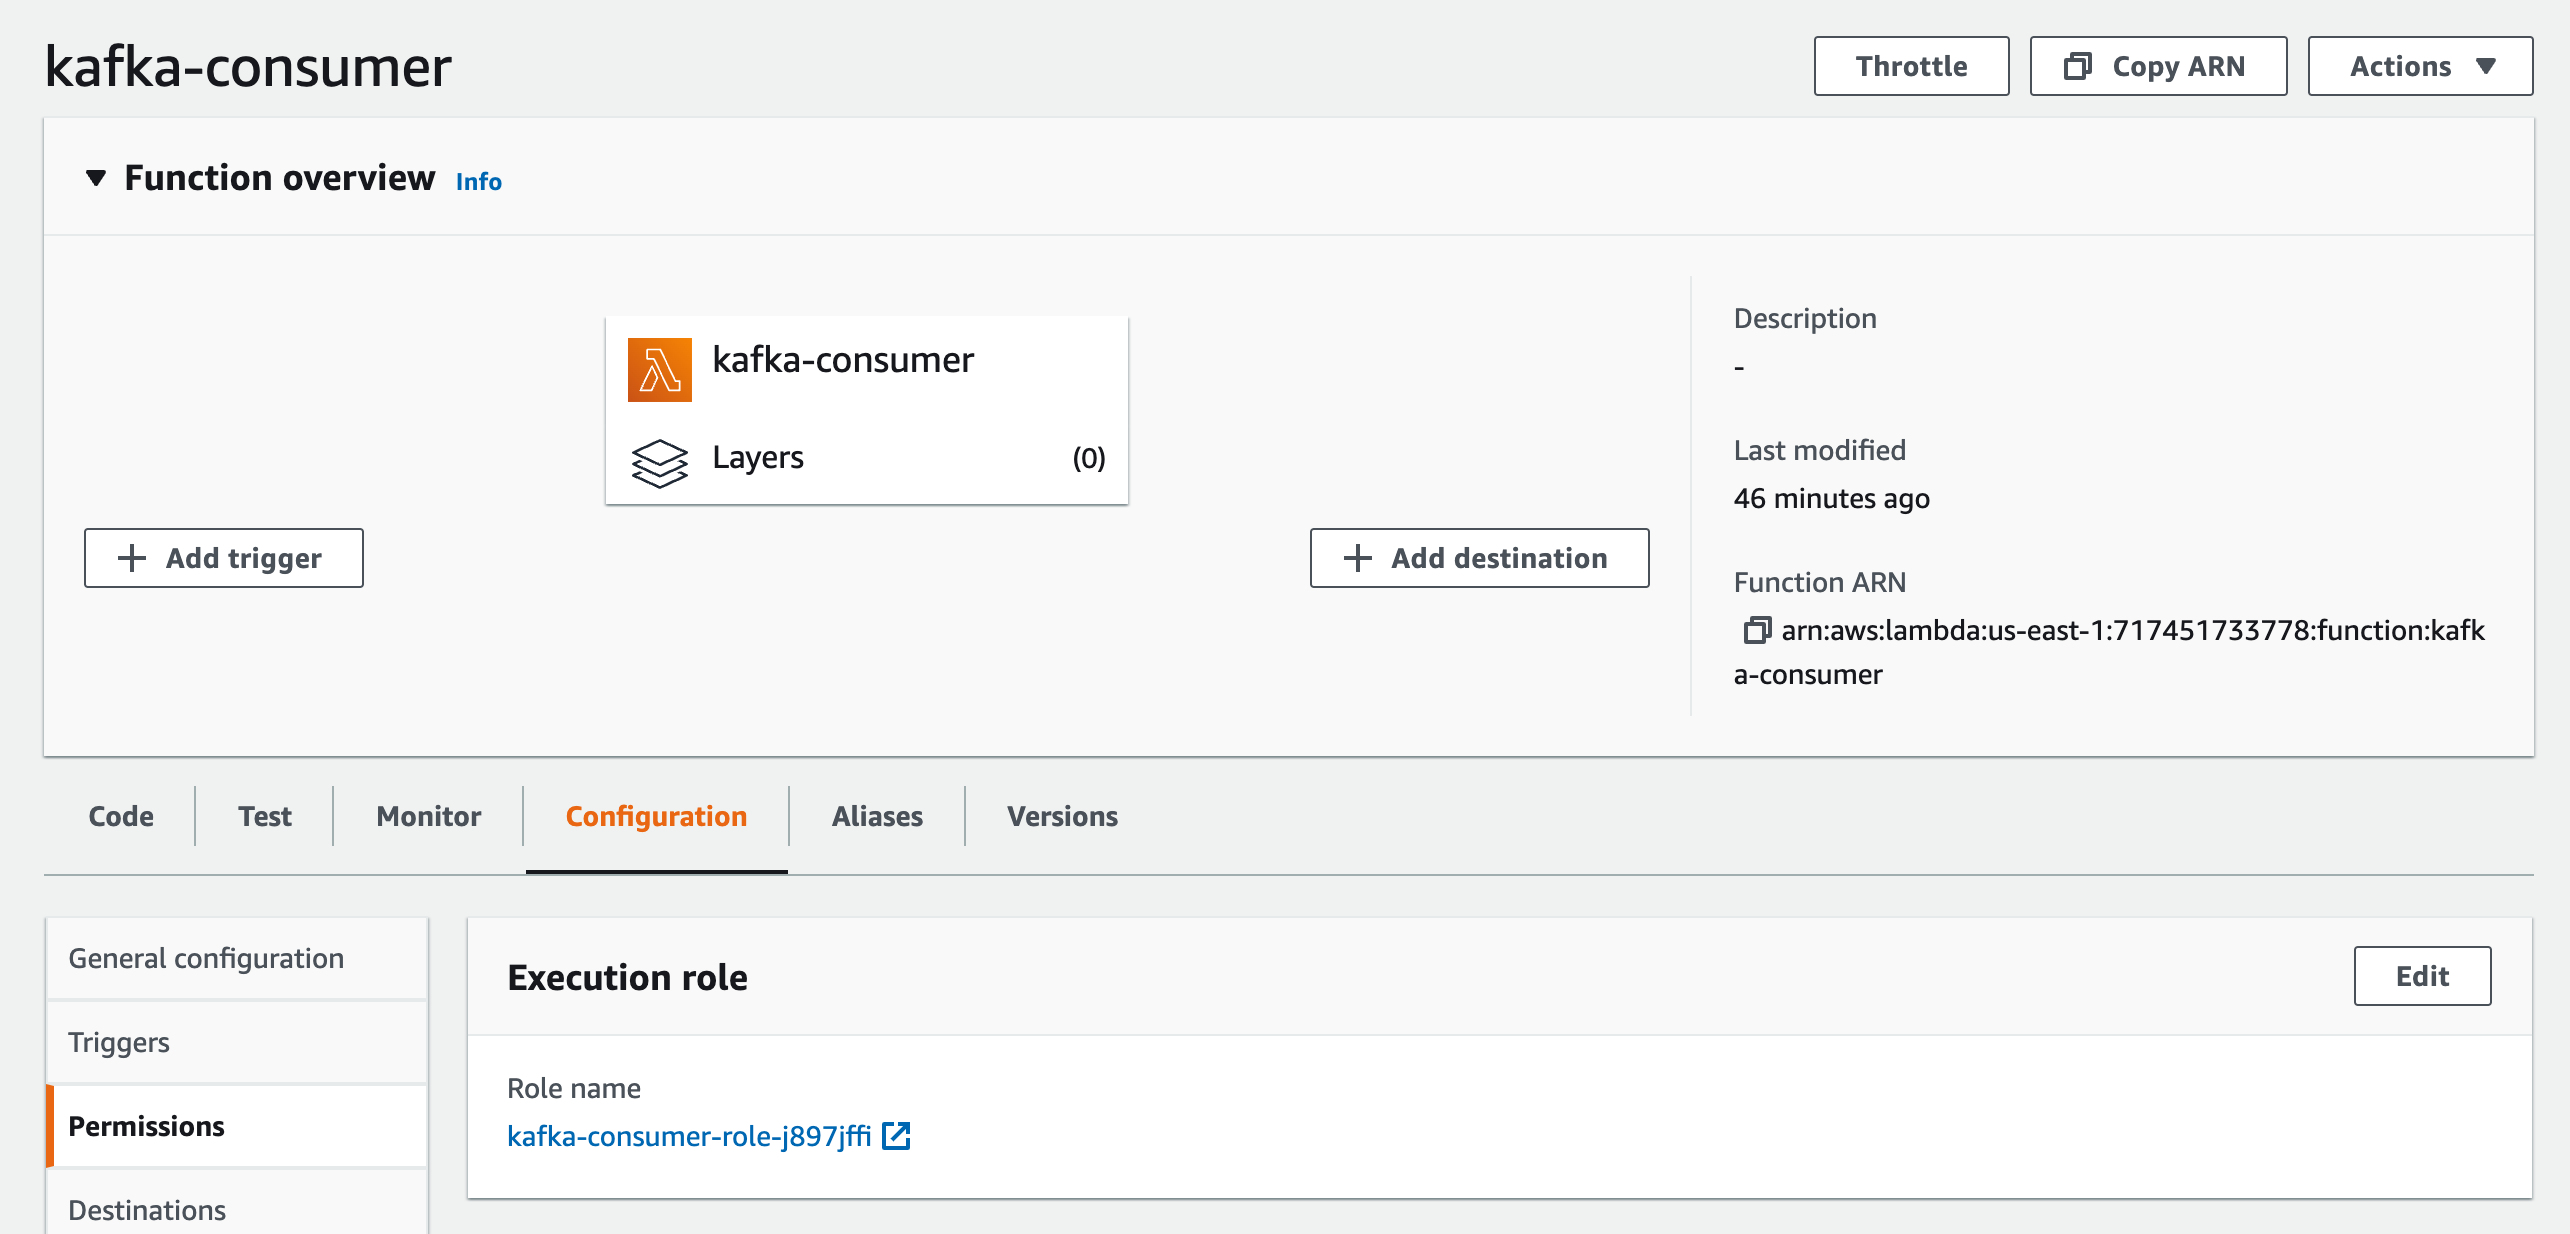
 ### Edit AWS Lambda Role
Now we need to configure the Lambda function’s role to access the secrets.
On the AWS Lambda function’s page, click on `Configuration` tab and
`Permissions`. Click to the link just below the `Role name` label.
### Edit AWS Lambda Role
Now we need to configure the Lambda function’s role to access the secrets.
On the AWS Lambda function’s page, click on `Configuration` tab and
`Permissions`. Click to the link just below the `Role name` label.
 The IAM management console will be opened in a new tab. On the `Permissions` tab
click on the link which starts with `AWSLambdaBasicExecutionRole-....`
The IAM management console will be opened in a new tab. On the `Permissions` tab
click on the link which starts with `AWSLambdaBasicExecutionRole-....`
 Click on the `Edit Policy` button and add this configuration in the JSON tab:
```json
{
"Effect": "Allow",
"Action": ["secretsmanager:GetSecretValue"],
"Resource": ["REPLACE_THE_ARN_OF_THE_SECRET"]
}
```
You need to replace the ARN of the secret that you created in the previous step.
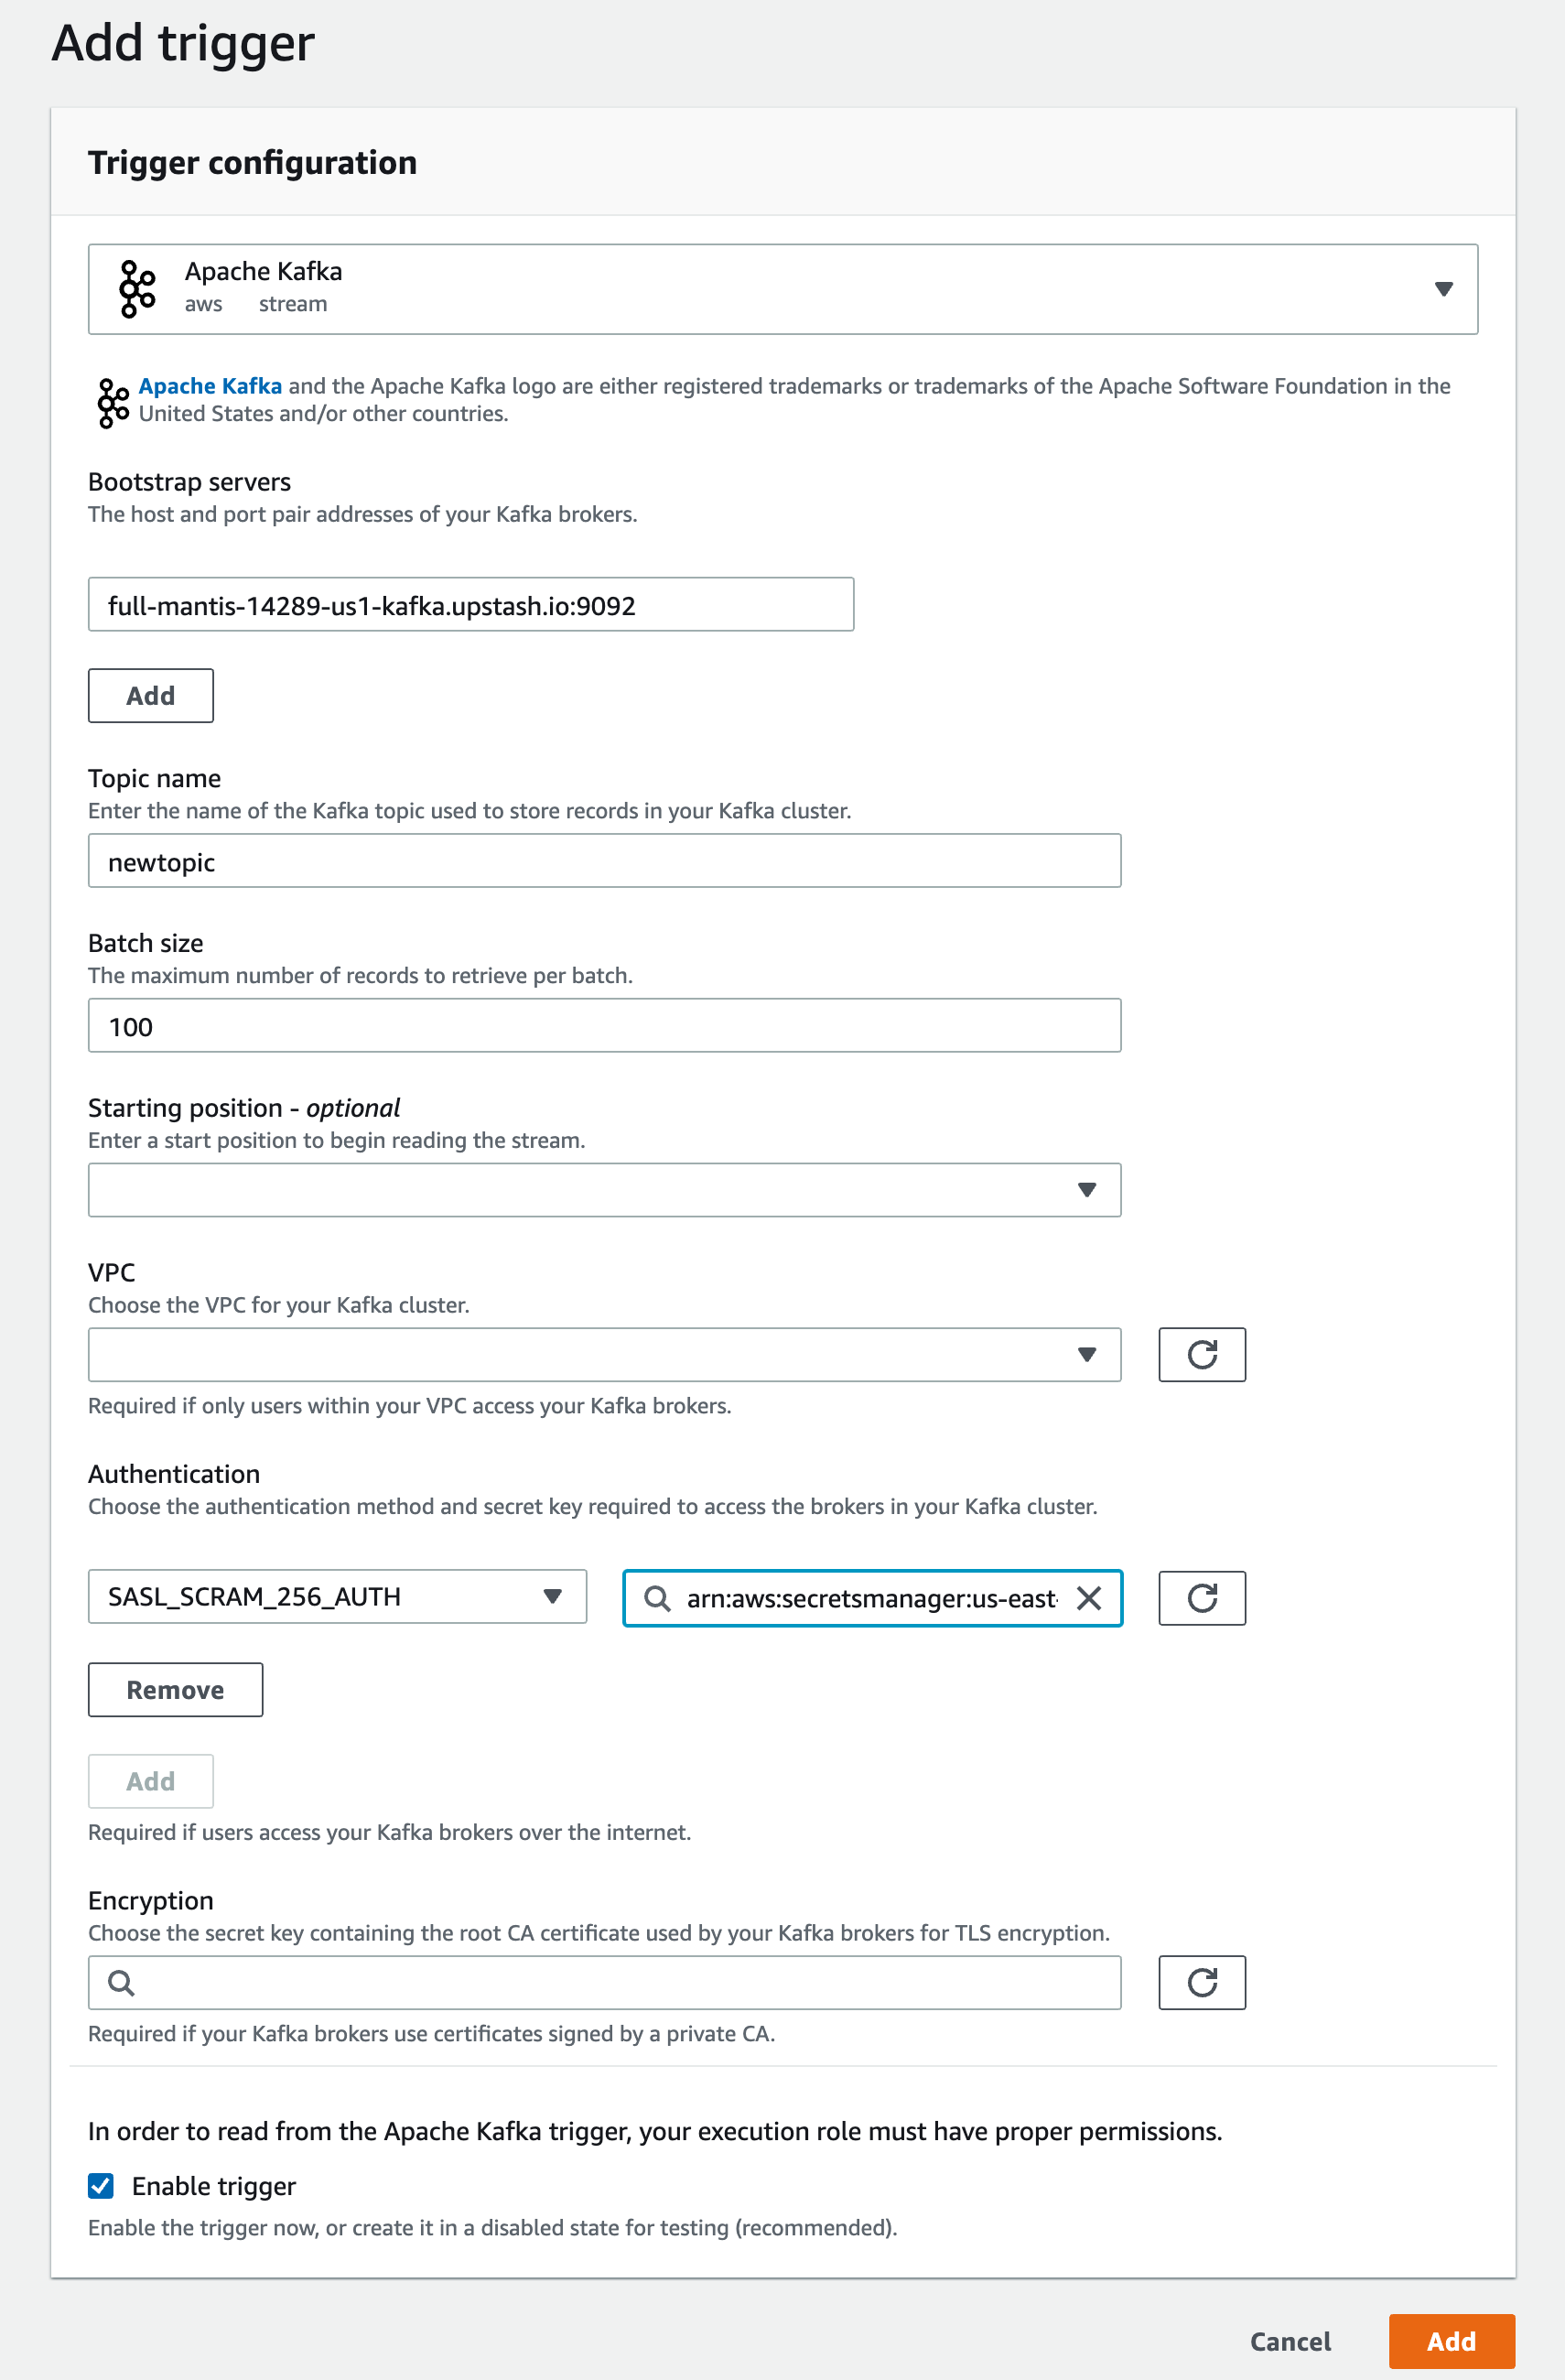
### Create the Trigger
Go back to your Lambda functions page and click the `Add trigger` button. Select
`Apache Kafka` from the menu and fill in the inputs.
Bootstrap servers: copy/paste endpoint from Upstash console.
Topic name: enter your topic’s name
Click on the `Add` button under Authentication. Select `SASL_SCRAM_256_AUTH` and
select the secret that you created in the previous step.
Check the `Enable trigger` checkbox and you can leave the remaining inputs as
they are.
Click on the `Edit Policy` button and add this configuration in the JSON tab:
```json
{
"Effect": "Allow",
"Action": ["secretsmanager:GetSecretValue"],
"Resource": ["REPLACE_THE_ARN_OF_THE_SECRET"]
}
```
You need to replace the ARN of the secret that you created in the previous step.
### Create the Trigger
Go back to your Lambda functions page and click the `Add trigger` button. Select
`Apache Kafka` from the menu and fill in the inputs.
Bootstrap servers: copy/paste endpoint from Upstash console.
Topic name: enter your topic’s name
Click on the `Add` button under Authentication. Select `SASL_SCRAM_256_AUTH` and
select the secret that you created in the previous step.
Check the `Enable trigger` checkbox and you can leave the remaining inputs as
they are.
 ### Testing
Now let’s produce messages and see if AWS Lambda is processing the messages.
Copy the curl URL to produce a message from
[Upstash Console](https://console.upstash.com).
```shell
➜ curl https://full-mantis-14289-us1-rest-kafka.upstash.io/produce/newtopic/newmessage -u ZnVsbC1tYW50aXMtMTQyODkkimaEsuUsiT9TGk3OFdjveYHBV9Jjzow03SnUtRQ:4-R-fmtoalXnoeu9TjQBOOL4njfSKwEsE10YvHMiW63hFljqUrrq5_yAq4TPGd9c6JbqfQ==
{
"topic" : "newtopic",
"partition" : 0,
"offset" : 48,
"timestamp" : 1639522675505
}
```
Check the cloudwatch **(Lambda > Monitor > View logs in CloudWatch)**. You
should see the messages you produced are logged by Lambda function.
### Testing
Now let’s produce messages and see if AWS Lambda is processing the messages.
Copy the curl URL to produce a message from
[Upstash Console](https://console.upstash.com).
```shell
➜ curl https://full-mantis-14289-us1-rest-kafka.upstash.io/produce/newtopic/newmessage -u ZnVsbC1tYW50aXMtMTQyODkkimaEsuUsiT9TGk3OFdjveYHBV9Jjzow03SnUtRQ:4-R-fmtoalXnoeu9TjQBOOL4njfSKwEsE10YvHMiW63hFljqUrrq5_yAq4TPGd9c6JbqfQ==
{
"topic" : "newtopic",
"partition" : 0,
"offset" : 48,
"timestamp" : 1639522675505
}
```
Check the cloudwatch **(Lambda > Monitor > View logs in CloudWatch)**. You
should see the messages you produced are logged by Lambda function.